Sunday, July 31, 2016

Adding a Tile Backsplash to the Kitchen

When we bought this house, I liked the cabinets, but the countertop was not my favorite. It was a plain laminate that just did not do justice to the quality of the cabinets. However, after living with it for a few years, it didn't bother me nearly as much anymore. I did start to notice an issue though behind the sink with water getting under the counter and the little laminate backsplash. Something needed to be done. I thought about it for a long time, and I decided to leave the countertop, but take off the backsplash and install a tile backsplash. 

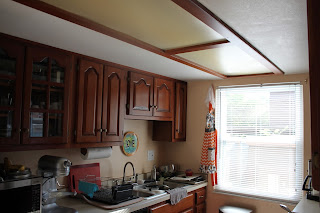
I'm going to lay it all out there and show you my kitchen in all of its useful kitchen glory. I try and try to keep it all picked up and clean, but it's the most used room in the house and it's just not that large. Plus, I think that showing you the way that real people live is healthy for us all! Here it is...


The lights are the next project on my list. Stay tuned!

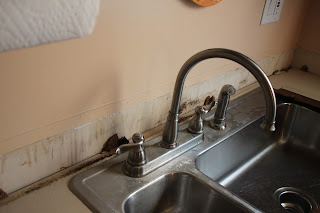
As you can see here, they installed the counters all as one piece but then didn't seal it. So all of the water that splashed out of the sink leaked beneath and behind this little backsplash. It was starting to pull away from the wall. 


I got the crowbar out and got to work. Joe helped a ton here because there were a bunch of screws left in the counter that he got out for me! You can see here just how much the water was doing damage. 


I mean, Ew!!!


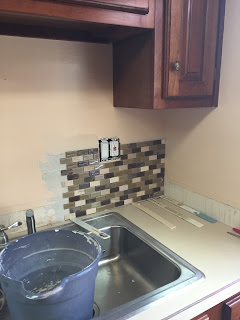
Once it was all off and cleaned up, I got to work on the tiling. It all went quite well until I got to the upper edges. It turned out that I needed to get a tile saw. I was freaking out about using one, but Joe encouraged/told me to get one, and that I could use it! And, it turns out that he was totally right. Thanks Joe! I was still freaking out a little bit, but I still have all 10 fingers and made some pretty nice cuts. :)


I made Joe take pictures of me at work to prove it was my project!

So, not to leave you hanging anymore, let me remind you what it started out looking like...


And after...


Ah! How lovely! We can just pretend for a minute that I don't cook or do dishes in here ever. :) I think it's the one small update that has made all of the difference in making this look like a fully updated kitchen. The good news in the end is that the wall is fully waterproofed too!

Monday, June 27, 2016

Bathroom Reno for under $250

Before and After

Our upstairs bathroom has been a room that didn't need a ton of work to update it. So I left it for about two years, and it was really functional and not offensive at all. However, I wanted to quickly bring it into this century with a new light fixture, new mirror and some fresh paint. 

This is what the bathroom looked like from the day we moved in. These pictures don't really do the walls justice. Picture the blue of a baby shower for a boy. That's the color these walls were. And let's just take a second to remember that the vanity had a really awesome 70's feel with the cream veneer with a gold paint trim. Gorgeous right?


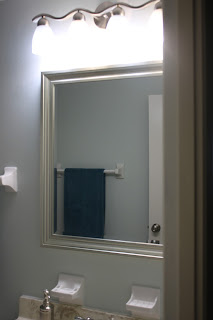
The first thing to change was the vanity. You can read about that change here.  The following pictures are to show you the mirror and the light that had to go.  The light was so hot that it was burning the paint on the side wall. I put my makeup on in there, and my goodness it almost melted off my face.  Can we just say yuck!?!?


The first thing I did was pull down the mirror and light fixture. Changing out the light fixture was not difficult except for the fact that the old light fixture was not installed in the center of the sink. It was just so large that I couldn't tell with the old one, but with the new fixture it was not OK! Also, whoever installed the last light did not put in an electrical box. So I had to hire an electrician to install an electrical box in the center of the sink. The light that I chose was the Portfolio 4-Light Paces Brushed Nickel Bathroom Vanity Light from Lowes.  

I got a new mirror too. I wanted one that could hang vertically and not hit the toothbrush holder and soap holder. I found this Satin Silvered Beveled Mirror from Wayfair.com. I chose a wall mirror as opposed to a bathroom mirror because it was lightweight and easy to hang. It was also the right size and style.

Ah!!! Isn't that refreshing and bright! 

The final thing that I did was to give all of the walls a fresh coat of paint. I went with Valspar Winter in Paris. It's a really pretty light grey blue. It also has some green tones to it. It's very pretty and far less baby boy blue. 

I think that this room really got the facelift it needed for just a small amount of money.

The budget breakdown:
Vanity paint- I already had a gallon of white
Vanity hardware- $5
Light- $69
Mirror- $69
Wall paint- $35
Electrician to install the light properly-$50 (he was already out to install a new fan in our guest bedroom)

Total-$228

So if you've got a bathroom that has a solid shower, toilet and vanity but needs some updating, for a small amount of money, you can do quite a lot with paint and a new light and mirror! Be brave. Paint and lights are not difficult. You can do it!

I know it may seem that not much has been done, but I think it's a huge difference and brings this bathroom into the modern age!


Monday, April 18, 2016

A Letter to My Baby on the Eve of Your First Birthday


Dear Sweet One, 

I haven't spent much time this past year reminiscing and being sentimental. I've been far too busy enjoying you and all you've accomplished in just one short year! Watching you grow and seeing what new things you've learned each day has been one of the biggest joys of being your mom. Maybe it's the teacher in me, but I found it all incredible to watch. I remember the first time you reached for a toy. What an achievement. Now, you can carry three toys while army crawling, one in each hand and the bonus toy in your mouth. Then there was that week you learned how to roll from back to front. You did that over and over for days. You were so proud. 

365 days ago (we had a leap day) was the day that our lived changed forever! What a wonderful blessed day that was. 5 lbs 8 oz (2500 g exactly) and 20.5 inches long, 10 fingers, 10 toes. You were small and perfect. Your father and I were so in love with everything about you!


I don't want to gush, but I do want you to know that we are still so in love with everything about you. I probably won't be too sentimental very often because I'm totally confident that you will continue to amaze me with all that you learn. I do want to stop occasionally and remember to treasure these moments, and the eve of your first birthday seemed like a good time to do just that. This very short letter only took me most of the evening to write because you needed some extra cuddles tonight. Getting teeth isn't very fun. I'm so glad that you needed those extra snuggles on this last night as my baby because when I snuggle with you tomorrow, I'll be snuggling a toddler. I can't wait to meet him and see what he has to teach us all!


We love you sweet boy! May God bless you this year and always. Happy birthday!

Wednesday, January 27, 2016

Monster Pants Knitting Pattern with stitched-in eyes and teeth


I made a pair of grumpybums monster longies from the tales of the Wandering Lady blog. They turned out well and are quite adorable. I wanted to make a second pair right away with a few touches of my own to make the knitting go even faster. So I used her pattern as the base and stitched the eyes and teeth into the pants using the intarsia method as opposed to using the duplicate stitch method that she uses. Using the duplicate stitch does give you more freedom in placement once the pants are knitted; however, it takes quite a bit more time and it adds bulk. Also if you're not good at it (me!), you are able to see the base color underneath the duplicate stitches.

This is the first time I've written out a pattern, so if you discover any mistakes, please let me know! The pattern is in 1 size for now. I hope to add a larger size once I have a chance to make it. This pattern is for 6 months-1.5 years. I have made them, and they are quite generous on my 8 month old. They are very stretchy side to side. If you have a petite 18 mo old, you could make these and just add length to the legs.


Needles: Size 6 (4mm) double point needles or circular needles

Yarn: Any yarn for size 6 needles. I used an acrylic yarn for washability, but I think wool would stitch up very nicely. Base Color (BC)- 1 skein, 1 skein of each stripe color (C1/C2), about 20 yards of white and 3 yards of black

Gauge: 20 stitches- 4 inches

Glossary:
K = Knit
P = Purl
CO = Cast on
yo = yarn over
P2tog = Purl two stitches together

K2tog= Knit two stitches together 
PM = Place marker
BO = Bind off
BC = Base color
C1 = Color 1
C2 = Color 2

W = White
B = Black

Monster Pants
Using BC, CO 92 stitches. Join the round, being careful not to twist. PM at the beginning of round.
Ribbing. 
 *P2, K2* Repeat for 6 rounds to create ribbing. 
Round 7- *yo, P2tog, yo, K2* Repeat - total 115 sts.
Round 8- *P2tog, P1, K2* Repeat - Total 92 sts.
Knit 5 rounds of ribbing.

Knit 2 rounds
On the next round you will need 2 small balls of White (W) yarn to start the eyes. If you are unfamiliar with the intarsia method, please google it and you will find very good websites and videos dedicated to teaching you how to do it. It is not hard at all, it is just learning how to manage the extra yarn.
You can find the chart for the eyes and teeth here. I find it easier to verify and count with the chart in hand. It helps you know what you will create in the end with all of the upcoming color switches.
Round 3- BC K12, W K5, BC K11, W K5, BC K remaining stitches
Round 4- BC K11, W K7, BC K9, W K7, BC K remaining stitches
Round 5- *Prepare 2 small black balls- BC K10, W K6, B K1, W K2, BC K7, W K2, B K1, W K6, BC K remaining stitches
Round 6- BC K 9, W K6, B K3, W K2, BC K5, W K2, B K3, W K6, BC K remaining stitches
Round 7- BC K 9, W K6, B K3, W K2, BC K5, W K2, B K3, W K6, BC K remaining stitches
Round 8- BC K9, W K7, B K1, W K3, BC K5, W K3, B K1, W K7 BC K remaining stitches
Round 9- BC K 9, W K11, BC K5, W K11, BC K remaining stitches
Round 10- BC K 9, W K11, BC K5, W K11, BC K remaining stitches
Round 11- BC K 10, W K9, BC K7, W K9, BC K remaining stitches
Round 12- BC K11, W K7, BC K9, W K7 BC K remaining stitches
Round 13- BC K12, W K5, BC K11, W K5, BC K remaining stitches

Knit 4 rounds with BC

For mouth:
-Change to C1, K 4 rounds
*Prepare 2 small white balls
- Change to C2, K17, change to W K5, C2 K6, W K5, C2 K remaining stitches
- C2 K17, W K5, C2 K6, W K5, C2 K remaining stitches
-  C2 K18, W K3, C2 K8, W K3, C2 K1 wrap and turn
- C2 P2, W P1, C2 P10, W P1, C2 P6 wrap and turn
- C2 K23 wrap and turn
-C2 P26 wrap and turn
-C2 K29 wrap and turn
-C2 P32 wrap and turn
-C2 K10, W K1, C2 K14, W K1, C2 K9 wrap and turn
-C2 P8, W P3, C2 P12, W P3, C2 P12 wrap and turn
-C2 K12, W K3, C2 K12, W K3, C2 K12 wrap and turn
-C2 P11, W P5, C2 P10, W P5, C2 P15 wrap and turn
-C2 K15, W K5, C2 K10, W K5, C2 Knit remaining stitches

Change back to C1.
Knit 4 rounds. On the last round PM "A" after 21 stitches. PM "B" after 4 stitches. PM "C" after 42 stitches and PM "D: after 4 stitches.

Crotch:
Change back to BC. 
K to A, increase 1 st before M, K to B, increase 1 st. after M, K to end of round. Repeat 5 more rounds. Total 104 sts.
Next round, K to A, increase 1 st, before M, K to B, increase 1 st after M, K to C, increase 1 st before M, K to D, increase 1 st after M, K to end of round. Repeat 5 more rounds. Total 128 sts. 

Next round. K to A. Cut the yarn, leave a 50 cm long tail. Using the kitchener stitch, sew the four middle sts front and back together. Place the stitches of one leg on a stitch holder.

Pick up 2 sts in the join (where the front of the leg meets the back of the leg in the crotch) to avoid a hole. 62 sts total on one leg.
K 5 rounds
*Change to C1, K 5 rounds
*Change to BC, K 5 rounds
*Change to C2, K 5 rounds
*Change to BC, K 5 rounds
*Change to C1 K 5 rounds
*Change to BC, K 5 rounds

*Knit stripes until legs are the desired length.

On the last round, K2tog* Repeat all the way around decreasing to 32 sts.
Knit ribbing K2, P2 for 12 rounds. BO loosely.

Repeat for other leg matching the number of stripes.

Work in all of the ends.

I-cord
In one of the contrasting colors- CO 3 sts, K3, Don't turn, but slide the stitches to the other side of the needle and continue to knit. Repeat until desired length, about 27-35 inches long.