Saturday, May 24, 2014

Wine Cork Memories

Hey all, I am taking a break from showing you progress on the house and sharing an idea for all of those wine corks that we all seem to collect. I know that if you're like me you've collected them for a while with the best of intentions of turning them into that really cute project you saw on Pinterest. But let's be honest, few of us will actually do these fantastic projects. Therefore, I give you a different idea for those corks that will make them meaningful and worth keeping forever! This idea came from a family wedding from last summer. Thank you Skippy Webber for the great idea. Are you ready yet for the idea after the big build up? Here it is:

Write the date and location or occasion onto the cork and save it in a cool glass jar. 

The Basque Cafe corks were the corks from Jayme and Skippy's wedding rehearsal dinner and the champagne cork is our most recent addition from the champagne we had after Joe's doctoral thesis defense.


Happy collecting! 


Friday, May 23, 2014

Tile Ideas for a SMALL Master Bathroom

Hey all! I'm on to the next room. Last night I started the work on the master bathroom. I already have a few things chosen for that room. I painted the current vanity white already, and I'm going to use the Valspar Lucy Blue for the wall color. I'm also in the middle of readhereing and caulking the shower stall so we don't develop mold behind that. It was beginning to peal away from the wall.

So, this is the bathroom as it started out. Whoever chose the flooring really loved green and yellow I guess. As you can see, it is a small space. The area to the right is a closet that will be mostly covered once it's all done.

Blue for the walls. The other colors are in the master bedroom.

Now here is the hard part, deciding which tile to use on the floor. My dad is coming in the middle of June with his tile saw and tools to help me get it tiled along with a few of the other bathrooms in the house (yes, we have four total). Yay for dads with tools! I started collecting ideas last night for the tile, and I'm hoping you'll help me with some thoughts or new ideas of your own. It's a very small space, so keep that in mind. It's about 20 square feet of tile total, and that includes the toilet area and the closet area that will be curtained off in the end. So the actual area a person will really see is about 2 feet by 6 feet. I've gathered pictures of floor tiling that I like and you can help me think through them. I would also appreciate thoughts on adding a small backsplash behind the sink.

I like the tiny tiles, color scheme and small backsplash.

I'm drawn to the tiles that look like wood floors. I think they are warm looking but would be durable in a bathroom. I'm just worried they are too big for the space.

I like the idea of the multicolor small tile. It can go with many different color schemes. I also like the it is small and on the diagonal.

I like the small marble with the band of solid on the edge.

Just a classic 12 inch cream tile on the diagonal?

Source: http://whendecadescollide.blogspot.com/2012/03/our-bathroom-remodel-is-finally.html
I like the classic black and white mosaic, but maybe not with the blue color on the walls?

I can't find the original source for this photo, but it's on my Pinterest page.
I like the simple tile, but I love that it is rectangular and laid in an alternating pattern.

Source: http://jennasuedesign.blogspot.com/ 
I like the different sized tiles in that pattern, but we may not have enough floor space to appreciate it.

Well there you have it! Mostly traditional in style, but there is a little contemporary in there. Please let me know what you think, or leave the link to other tiling ideas in the comments section. I promise to let you know what we ultimately decide on and show you the end results. 


Tuesday, May 20, 2014

Master Bedroom: It's so close!

Hey all! I'm back. I was in California for a few days watching Joe defend his Ph.D. thesis, hence the pause/delay in getting this bedroom done. But yay, go Joe! It was a very proud moment for me. 
If you haven't seen the before pictures, you won't be able to appreciate how much has been done to this room. Therefore, I'm including a few for your viewing pleasure and to remind you in case you have forgotten just how delightful this space was prior to my painting extravaganza.


Today was a big day. I got most of the finishing touches done. I hung the new blinds, rehung the bathroom door and closet doors.  Let me tell you, those closet doors were something else. I tried just rehanging them the same way they came off, but that must be some thick paint because I could not get them to slide past each other. I ended up having to chisel out a section on the back to make the hardware flush with the doors so they could slide. There are a few good news items coming out of that though. One, I now know what to do on the next two sets of closet doors to start with, and two, I am the proud owner of three wood chisels.  Lowe's has a line called Project Source. Woah, is it priced right: 3 chisels for $10! 
I also painted at the edge of the ceiling to cover up the inch of yellow that they poorly painted onto the ceiling.  I'll have to go over with another coat of ultra white still, but it looks much cleaner already.  And, lastly, Joe helped me move the headboard from the guest bedroom and position it correctly.  I do love my headboard, but for the life of me I can't find any way to attach it to the bed frame.  I think it was originally supposed to be for a sleigh bed, but when I bought it from the people on Craigslist they said I just needed to find the hook-in bed frame. Yeah right, that totally didn't work. Ah well, live and learn. It works well just by leaning it against the wall.
Time for the pictures. Enjoy!


There is still a bit more to do before I'd call this room done. Getting new carpeting is one of those things, but, it may be a few months before that happens which is fine.  It's not terrible, and it's clean and soft. I'm also working on refinishing a few bedside tables. I just started sanding them tonight. Look for more on those in the future. I'm also on the hunt for some dressers. It's tough to find dressers that I really love, so the search continues. And finally, I plan on making a few curtain panels to beef up the look and hang some artwork on the walls for a finished look.  Already though it's so much lovelier and more enjoyable to be in. Thanks for following along with the progress. Once I get the final touches done, I'll do a true before and after reveal post, but that may be a few months. I'll keep you posted on my new projects though, don't worry!

Tuesday, May 13, 2014

The New Closet System!!!!


Yay! I got the closet system installed. After looking online at prices (these things can get expensive), and reviews (what did we do before reviews?), I decided on the Rubbermaid 3H89 Configurations 4-to-8 Foot Deluxe Closet Kit in white. And no, they are not paying me to say this. I liked the price and the reviews. I liked all of the different hanging bars and shelving options and how I could easily change the configuration as needed. Most importantly though it looked like something that I would be able to install on my own with a little elbow grease. 

Overall I would say it was straightforward and physically easy to do. The two things that I found to hardest were finding the studs and inserting the drywall anchors. Otherwise it was a matter of measuring, drilling and using a level. This is really so much nicer than the wobbly shelf and bar that were in there before. I'm glad I went this this option. 

As you can see, we still have to put most of our clothes in it still, but now we can! I also have to put the doors back on, but I want to get the clothes in first.The final big thing in this room will be the carpeting. Isn't that such a lovely green? All in good time though. For now, I am excited I have this done and being that much closer to a finished room! 

Sunday, May 11, 2014

Master Bedroom: Update Number Two

Hey all! I'm back with another little update on the progress in the master. I know, I agree, I'm also thinking it really ought to be done by now. In my defense though the moving truck arrived on Monday afternoon with all of our stuff, and I've spent an awful lot of time this week unloading and unpacking. My sister came on Wednesday night and helped me get the kitchen set up.  Ah! What a relief that was. Thanks Emily!

I still have made some progress in the master bedroom though. All of the walls in the bedroom are finally painted. I ended up "calling an audible," (as Joe tells it) :) and steering away from the accent wall. It is amazing how much brighter that blue ended up looking after I painted it on two feet of the wall. I should have learned my lesson in the last place I painted. If you're trying to put two colors together in one room, always always get sample paint. All is not lost though, I'm planning on painting the master bathroom with the blue. I think it will really liven up that space.

Since my sister came we are even sleeping in the room with the quilt I made. You can see my post about it here. Yay! It's nice to finally see it on the bed being used.


Joe moved a pine cabinet upstairs to use as a nightstand. I painted it black a few years ago and think it looks quite nice against the wall color next to the bed.

Joe also helped me get the bedroom door up then too. The spray painted hardware looks better than the gross bronze, but I can't say that I will do it to the other door hardware. It ended up being way more of a pain than it was worth, and it did get a bit dinged up when I installed the handle and when we put the door back on.  Not worth changing out right now, but maybe down the line.

You can see that we still have the bathroom door to reinstall.  It's ready, but I need to find the other tool kit in one of the unpacked boxes.  

Joe helped me get some curtains up. We realized after night one that we needed something covering the windows right away since our bedroom faces east and the road outside is pretty busy. I know that having just one panel on each window right now looks funny, but I have plans to add some teal panels on the outsides of the curtains once I get my sewing machine set up. It will provide balance and tie into the quilt. I'm also going to put the blinds back up, but I need to replace one of them that was broken when we moved in.


I feel that I still have quite a bit to do in here, but hopefully tomorrow will be a day of lots of finishes. As you can see the closet is still empty and the new Rubbermaid closet system is strewn about the floor. I started working on that today since I found my drill yesterday. I need to get the correct drill bits tomorrow to do the job properly. I'm excited to get that installed so that I can unpack more of our clothes. It will clear up the extra bedrooms and make this room more useful.


Monday, May 5, 2014

Master Bedroom: Update Number One

Hey all! Thanks for checking out my previous post on the master bedroom and where is started.  If you haven't had a chance to see what it looked like before you can find it here. I've been working on various parts of the room for four days now, and I'm not certain that it really looks all that different, but I've been asked for a progress update.  Even though it doesn't look that different, it sure feels like I've done a lot of work.  Sometimes I think that making all of the small changes and preparing the space takes the most time but doesn't give the most immediate impact.  However, I think that leaving any one of these small things undone would detract from the space in the end.

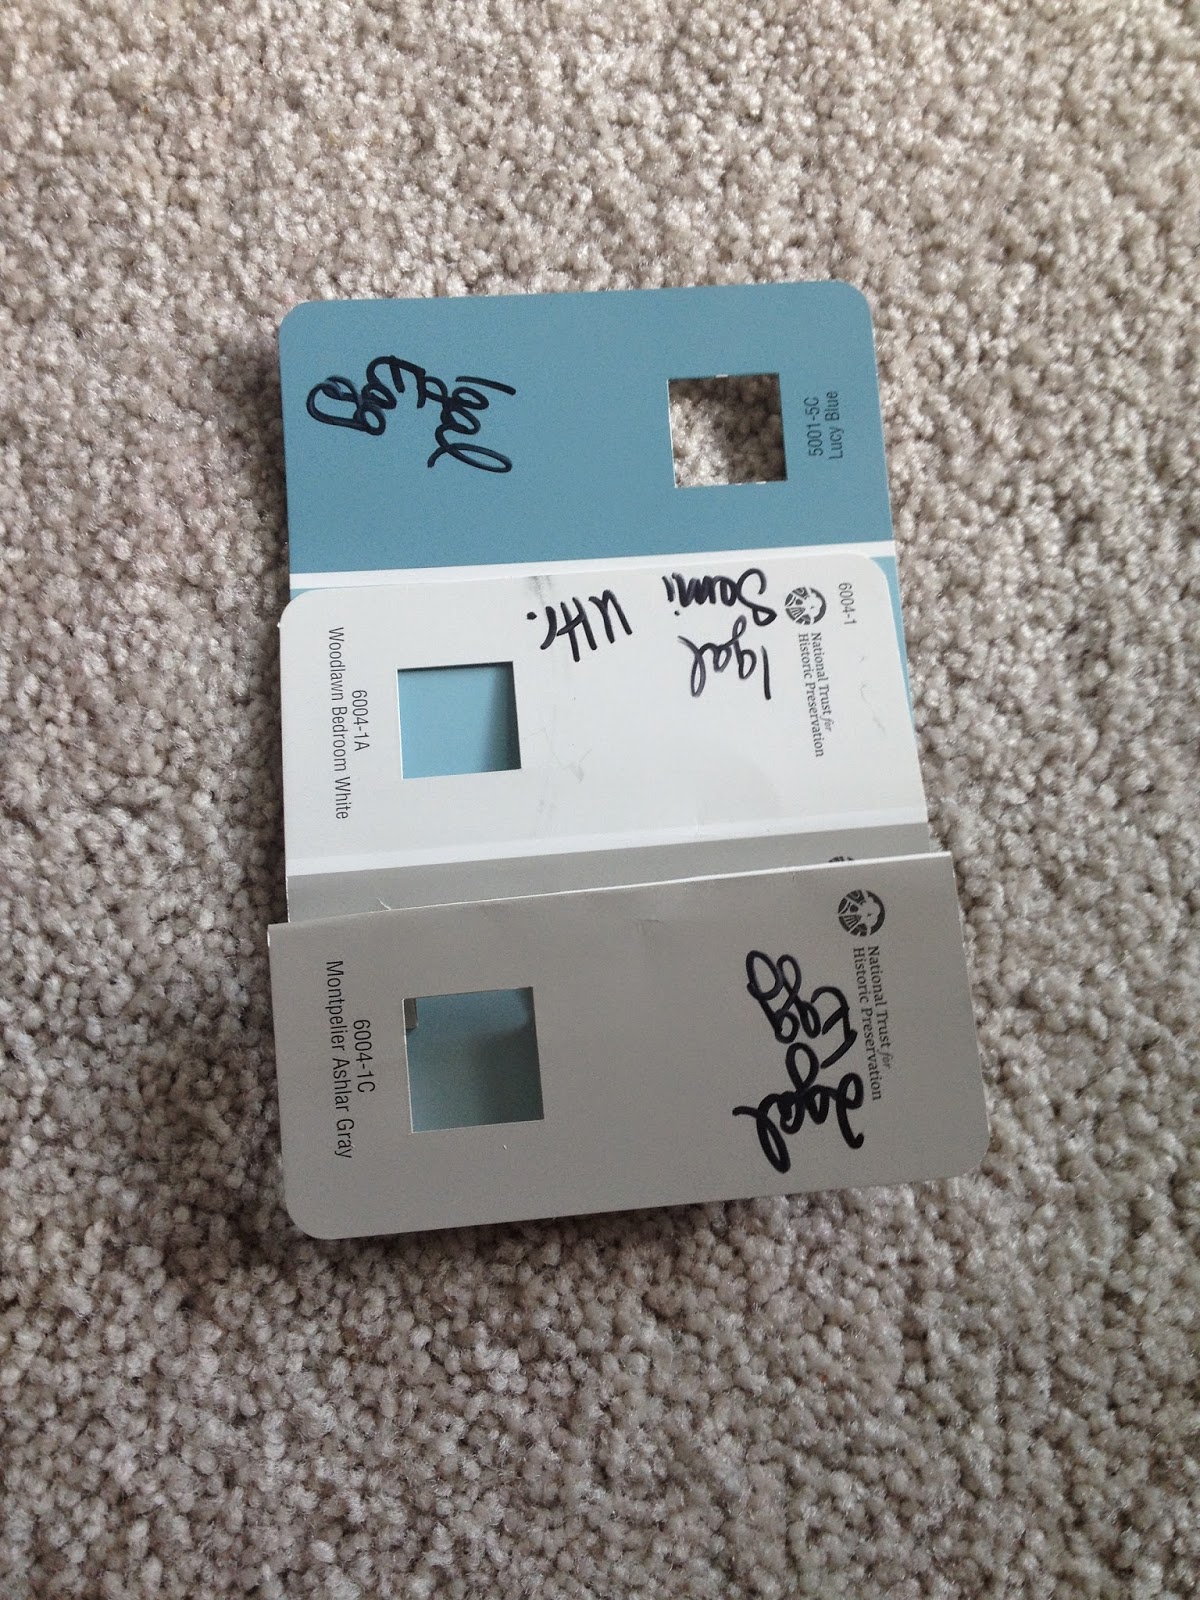
So, what have I done? Well, I know the way to Lowe's now!  That daily trip during any project... let's just say I'm glad it's only been one trip per day.  I've also primed, sanded, painted, sanded again and painted a second coat on 5 doors and all of the bedroom trim.  I used two coats of the Valspar Woodlawn Bedroom White, and wow does it look so much fresher and cleaner.  I didn't even try to keep the paint off of the walls since I'm painting them, but it's just such a relief to be rid of the brown trim that I don't even care at this point.

Before:

After:


See what I mean?  Don't you just breathe a sigh of relief?

And here is one of the doors:
So much cleaner! The wood was so old and dry it just soaked up all of the paint.

Besides painting the doors and trim, I also decided to use that same color on the bathroom vanity.  I'm loving how that is coming along.  I thought at first I would just reuse the old hardware, and then I found a flat silver spray paint left in the basement.  I gave that a try, but it really turned out to just be an ugly color and the shape was not at all what I was looking for.  I ended up getting some new brushed nickel drawer pulls and hinges. I need my drill to do some pilot holes for the new hinges, so the doors aren't back on, but I'll show you anyways.  

Old spray painted drawer pulls

New drawer pulls. Sorry for the poor lighting, I had the electricity off at this point.

I am also attempting to spray paint the door hardware black. I got the idea from one of my favorite blogs, Thrifty Decor Chick. She said it didn't hold up as well as she hoped on an exterior door that was used all the time with keys, but I'm hopeful for this interior door handle.  


I sanded the bronze coating down a bit and then did a coat of spray paint primer designed for metal.  Then I did several coats of a metallic black letting it dry between each coat.  I'm hoping that it will have time to really cure before it gets used. I'll let you know how it holds up.

I did one more major thing today.  I decided to change out the electrical outlets and switches from the standard to the decorator style.  The outlets were original I'm sure.  They were really yellowed with lots of previous painting disasters on them.  Some of them didn't work, and some of them just didn't match.  It's really a pretty cheap and simple thing to switch out, and I think it will give the whole room a more complete and professional look in the end.  I watched this video for help on the outlets, and this video from Lowe's for help on the light switch. Seriously, so easy. And I think it really looks nice, but judge for yourself!


I would be remiss if I didn't mention my big helper and constant companion these past few days of working.  

Carson has gotten lots of exercise with me going up and down the stair and trying to help me paint and change hardware and outlets.  He's only stepped in the paint tray once.  Mostly he just monitors my movements from his comfy dog bed.

Thanks for checking in.  Hopefully another four days will have this space painted with some furniture in it.  


Friday, May 2, 2014

Where to start? Master bedroom makeover!

We are the proud new owners of a 1974 townhouse in Ohio! Joe arrived on Sunday, and I made it Tuesday night with the car and the dog. As you can see, Carson was ever so helpful in the transit across the country. I'm very thankful that we arrived safely.  


I spent the first day unpacking what I was able to bring in the car, but a car can only hold so much stuff.  Day two, and it was time to start painting.  I decided a while ago that I would like to paint the master bedroom first for several reasons.  First, it is incredibly easier to paint an empty room than one full of furniture.  Second, the colors in there... Ugh.  You'll see in the pictures below, although I don't believe the photos do it justice.  Yes, the carpeting is green, the trim is brown and the walls are yellow. In what decade was that ever popular?  Oh, the 60s you say?  Yeah, that's what I thought too.  But even the 60s would have rejected this room. Wrong shades. And for my final reason, I love having a bedroom that is a calming sanctuary.  The rest of the house can be terrible, and I'll still be happy if I can escape to a beautiful bedroom.  

I know that you're dying to see what it looked like before I got started.  Ready?  

The mess is the box of painting supplies that I brought.

Aren't the colors so nice?

Yes, those are brown curtains. I took them down and left them in a pile. Carson thought they were so awful that he actually peed on them. (We're working on how best to express our distaste.) 


Entrance into the bathroom.

What pretty linoleum floors! Ugh!

50 points to anyone who knows that this black box is. I had to look it up online to figure it out.

Old phone jack

Really not sure what this is.

So many empty electrical boxes and unused doodads.

Two switches, but only the dimmer on the right even works.

As you  can tell, I have a lot of fun ahead.  I'm going to paint all of the doors white. I'm attempting to spray paint the door hardware a metallic black. I'll let you know how that turns out. I'm also planning on replacing the switches and outlets in the room to the decorative square versions.  There is such a mishmash of electric going on in this house, that I think matching pieces will add that final touch of finish. 

I've found three paint colors to work with that I'm really excited about.  I wanted to find colors that were somewhat neutral that worked with the bed quilt I made.  I decided on Valspar Woodlawn Bedroom White for the doors, bathroom vanity and trim, Valspar Montpelier Ashlar Gray for most of the walls and Valspar Lucy Blue for an accent wall and the bathroom. 


I started preparing the walls and priming all of the doors and trim yesterday. Today I hope to get the doors and trim finished.  I need to wait on the walls until my ladder arrives in the moving truck.  Keep watching for updates.