Friday, February 7, 2014

Completed Canyon Trail Quilt

First of all I will apologize for the terrible quality of the pictures.  These are pictures I took on my phone throughout this quilting project to send to my mom and sisters.  Also, my decent camera was damaged on a recent trip, so I'm pretty much relegated to phone pictures until I replace that.  So thank you for your understanding!  Saying all of that, I feel too excited about completing this that I don't care that the pictures are terrible.  I just want to share anyways!  

After we got engaged, I decided to make a quilt for Joe and me to use on our bed.  I found this Single Irish Chain quilt in the June 2012 issue of American Patchwork & Quilting.  The quilt is called Canyon Trail and can be found on page 90.  I picked out these colors because I love the teal and brown look, and I liked how this also had some complexity with the sage greens and creams.  After many many hours of cutting, piecing and sewing, I got to the stage of having the top completed as you can see in this picture.  

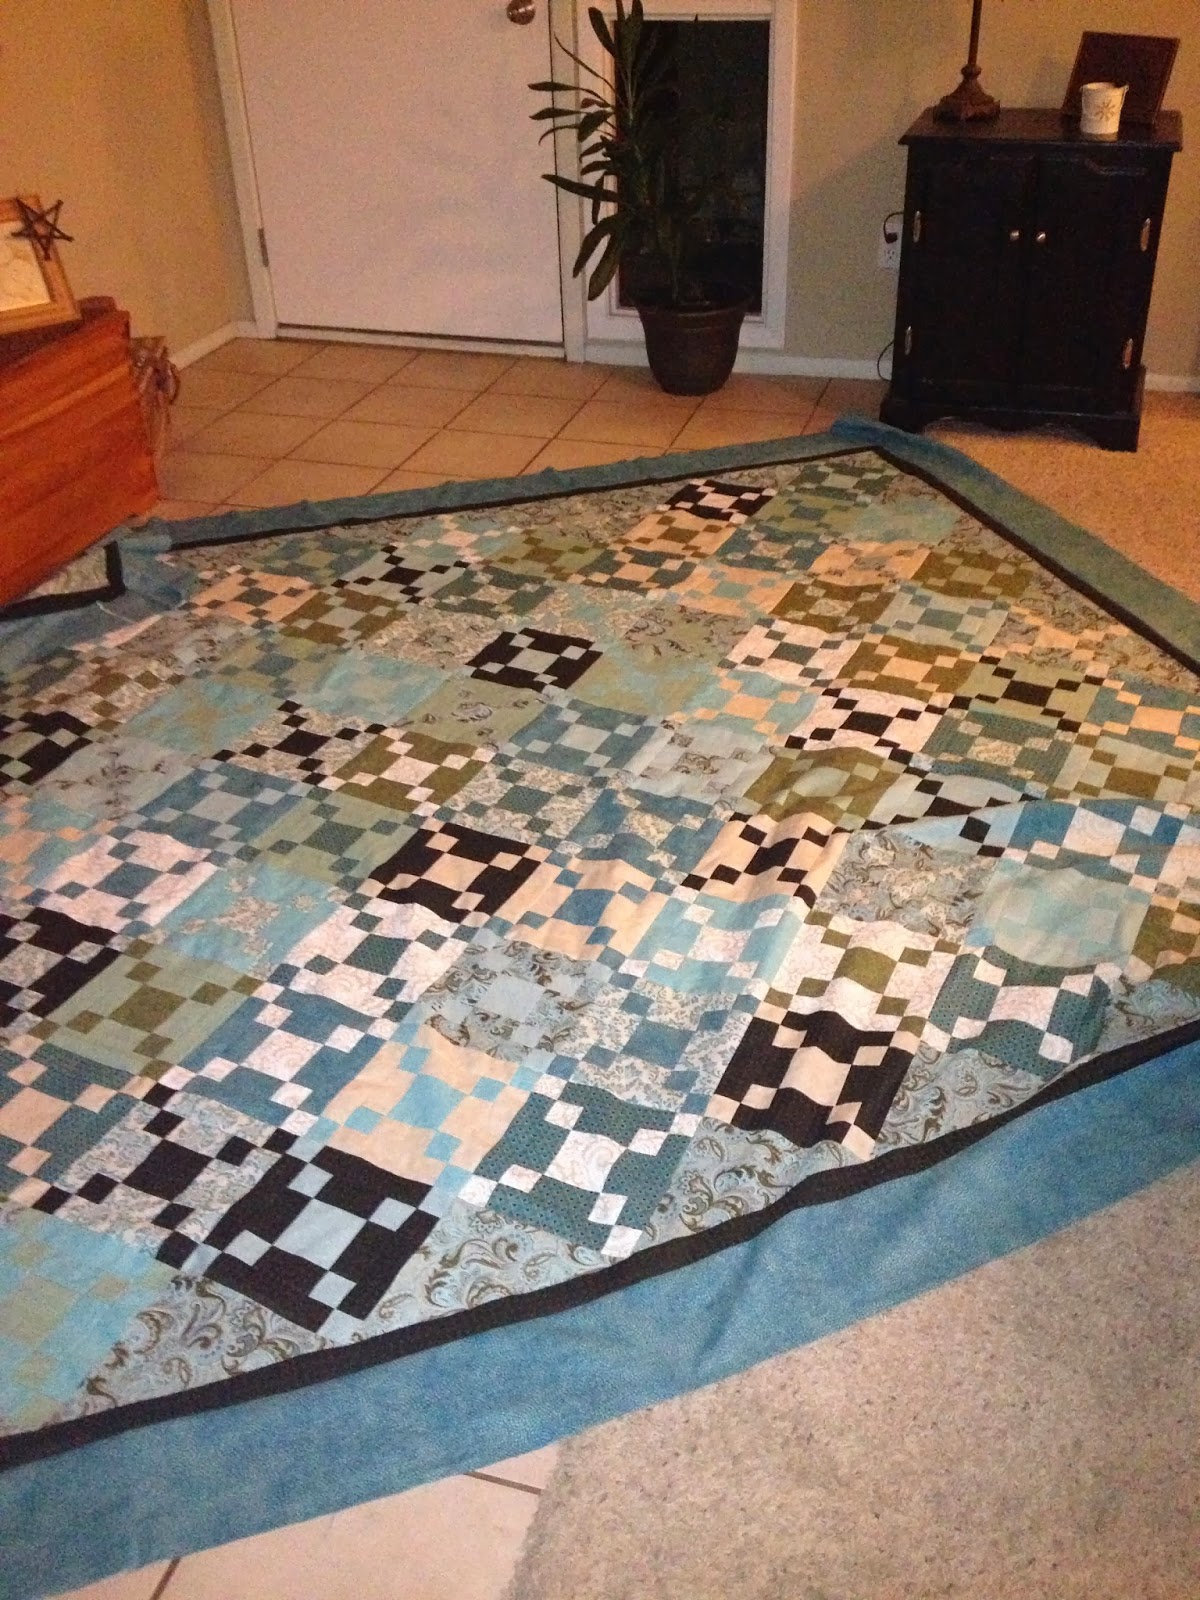
The quilt top just finished and laid out for a little photo session

I have always machine quilted my previous quilts, but I've never done anything this large or honestly this neatly.  I didn't want to screw it up, so I bit the bullet and had it professionally quilted this summer on a long-arm quilting machine by a lovely lady named Phyllis Domeier.  She lives in New Ulm, MN.  I took the quilt with me to New Ulm on a visit in July to my parents' house.  I know I could have had it done locally, but she did it for about half the price and did a fantastic job!

After I got it back from her in September I still had to sew on the binding.  To do that, first I sewed the binding onto the front side, and then I had to hand stitch the binding around the edge of the quilt and onto the backing.  I finished the last stitch just last night.  It was a lot of hand stitching, but I did get distracted making a lot of other projects.  Also, we can't actually use this quilt yet until we move, so I didn't have that pressure to get it done.  I'm super excited to announce though that last night I put in the final stitch on the binding!  It's done!!!  Joe and I will be moving to Dayton, Ohio in the near future (date TBD), so it will be fantastic to put this on the bed.  However, I have further plans for the bedroom.

Downtown LA has wonderful fabric shops.  The last time I was down there I decided to take the quilt along and look for fabric for the curtains.  I found a beautiful striped silk with a nice silk solid to make a contrasting panel for some full length panel curtains.  That morning before I went shopping I also found this awesome DIY tufted headboard tutorial from Thrift Decor Chick.


It inspired the purchase of some great brown linen to try my hand at making my own headboard.  You can see the fabrics below.  I put the quilt on the bed, laid the curtain fabric on that and then draped the headboard fabric over our current headboard to see how it all looked.  I'm looking forward to sharing a more completed look in the future.  For now, you'll just have to imagine the possibilities with me.

Curtain and headboard fabric


Finally, here is the picture that I took literally right after I stood up from the couch and threw the quilt onto it in my excitement!


Thursday, January 30, 2014

Roasted Brussels Sprouts with Bacon

This cooking class that we went to the other night was supposed to have a Brussels sprouts recipe, but we ran out of time.  The teacher let us take the Brussels sprouts home to make on our own.  Perhaps I should have tried his recipe, but this one is tried and true for us.  It's the perfect way to make the sprouts crispy on the outside and roasted on the inside.  And let's be honest, bacon, need I say more?

Preheat the oven to 425˚.

Prepare the Brussels sprouts by rinsing, cutting off the bottoms, and halving them.  I cut about 15 for the two of us for a side dish.

Use a cast iron skillet for this dish because it will transition from the stovetop right into the oven.  Turn on the heat to medium and add 2 slices of bacon.  Allow it to cook about halfway.  I find that if the cast iron skillet is too hot it will just burn the bacon.  I usually end up turning it down to medium low once I add the bacon.  

Once the bacon is cooked halfway, add the Brussels sprouts and a 1/4 teaspoon of salt. Sauté for about 5 minutes.  During this time, I used a knife to cut the bacon into pieces right in the skillet.  The Brussels sprouts should start to look golden as you can see in the picture.


Use a hot pad and transfer the entire skillet to the preheated oven.  Leave in the oven for 15-20 minutes.  They should look a little darker, but not burnt.  I left mine in for 20 minutes and you can see how they turned out.  


Perfect!

Heirloom Tomatoes with Basil and Marinaded Mozzarella


Joe and I went to a healthy cooking class on Tuesday night.  It was so delicious, salt encrusted salmon, tomato bisque, crostini with bruschetta... yum!  Besides all of the delicious food that night we were able to take home some of the extra heirloom tomatoes which provided the start of this appetizer.

I bought an 8 oz. package of fresh mozzarella at Trader Joe's and cut it into three sections.  I placed it in a storage container and poured olive oil over it until it was coated but not drowning.  I then put Trader Joe's South African Smoke Seasoning on that to make it amazing!  I put the container in the fridge to marinade for a few hours.  As a side note, if you don't have any South African Smoke Seasoning and don't live near a Trader Joe's, let me know and I'll find a way to get you some.  It's delicious on roasted veggies, eggs and meats.  

When dinner time rolled around I sliced up one heirloom tomato, put one basil leaf on top of each slice.  Then I cut a small piece of mozzarella to top each slice and sprinkled a little of the olive oil in the cheese container over it all.  To make it perfect, I ground a little more South African Smoke Seasoning on top.  


Wednesday, January 29, 2014

A Lutheran Perspective on Vaccinations

After a recent discussion on Facebook about vaccines, I wondered what the Wisconsin Evangelical Lutheran Synod's (WELS) stance might be on the topic since this is the church body to which I belong.  I looked in the Q & A sections of both Forward in Christ and Christian Life Resource (CLR) websites.  Neither yielded any results on the topic with the exception of one article on CLR that was not exactly pertinent to the discussion.  I submitted a question to CLR and received the following answer that I want to share with those who read this.  I feel that it is an answer that is thoughtful and thought provoking with some good points made. I'm sharing this answer with permission. 
 I'm assuming that if you've clicked on this post then you are concerned and interested in the topic and will leave respectful comments below.  If you have further questions or concerns about the issue, I'd strongly encourage you to contact CLR directly.  Pastor Fleischmann was very timely in a response to my questions.

You Wrote:
What do I say to the mother who believes that vaccines are more harmful to her children than the actual diseases that they prevent and therefore will not vaccinate her children?  I feel that this is dangerous not only for her children but also for infants and immune compromised individuals who have not or cannot be immunized.

Reply:
This is a challenge of “facts” which generally can only be resolved with the “facts.”  Specifically, our requirement in Scripture to obey the government (Romans 13:1) means that we ought to obey the governing authorities unless they ask us to do something contrary to Scripture.  Refusing immunizations when the government has specifically requested its citizens to take the vaccines them places the onus on anyone who refuses to do obey.

This mother’s claim is that “vaccines are more harmful to her children than the actual diseases that they prevent.”  That is a serious accusation and also one that, if true, should be easily proven.  Therefore, the mother should be asked the following:
1.      If it can be proven that the immunizations are safer (for her children and for others) than the actual diseases, then would she consent to the immunizations?
2.      What proof does she require to make the case?
3.      It might also be interesting to explore what evidence she may have that would support her contention about the vaccine being worse than the respective malady it treats.  While I am not aware of any scientific evidence she may have access to information that I have seen.

There are people who object to vaccines for fear that they are or might be worse than having the disease itself.  Those concerns are vigorously addressed in the FDA approval process and then tracked in the years following the approval of each vaccine.  To honor her commitment to act contrary to the wishes of the government she would need to provide evidence comparable or exceeding the evidence the government presents for the safety of the vaccine.

There is growing concern about what is called “herd immunity.” The concern centers around the danger posed by those who refuse vaccines.  Because a Christian is called upon to be equally or more concerned about others than him or herself (Philippians 2:3-4) he or she must considered the risk the disease poses for others – especially if those “others” are in a weakened condition (i.e., elderly, ailing, etc.).

In the end the government does permit “conscientious objections” for religious reasons.  If “religious reasons” are claimed, then they should be substantiate.  To my knowledge there is no evidence to support the contention of the mother.  I cannot see at this time how she could support her claim but she should, for the sake of all others, make her case.

Pastor Robert Fleischmann
National Director

Christian Life Resources

Friday, January 24, 2014

Using up the Scraps: Makeup Brush Holder!

I've been sewing a lot the past few months.  It's been a ton of fun for me to get creative and use lots of happy colorful fabrics.  It is rewarding to create and complete a project.  With all of the sewing though comes a lot of scrap fabric.  I never sewed this much before so I'll admit to just throwing the scraps out.  However, I felt pretty guilty about this once I started sewing more.  But then, I hate clutter and saving things just for the sake of saving them.  The other night I decided to get with it and do something with my growing pile of scrap cottons.  Hence, the makeup brush holder.  I headed to Pinterest to see what I had already pinned and came up with this makeup brush holder.  I made 10 of these bad boys today, and I think they are just adorable!  

Here are just a few to inspire you to get out your scrap pile and get sewing.  

Flowers and polka dots anyone?


And who doesn't love elephants?


If you don't have the scraps or don't want to sew, head here to get one of your own!

Happy sewing everyone!


Saturday, January 18, 2014

Oatmeal Cinnamon Waffles

Joe and I got married a little over a year ago.  It didn't take long for us to establish a Saturday morning breakfast routine.  I made oatmeal waffles a few weekends in a row without really thinking about it, and then one weekend in June we didn't have all of the ingredients.  I just ate a bowl of cereal when I woke up, but a few hours later when Joe got up, he asked for waffles.  I explained the lack of ingredients and this just wasn't going to fly.  He got dressed and went to the store then and there to get the needed items and since then, the waffles have become a weekly staple in our lives.  I told Joe in December that I should really start a blog and put this recipe as my first post.  Well I'm not sure how it happened, but I somehow got 6 other posts done before this one.

I started making oatmeal waffles with a recipe that I got off of Cooks.com years ago, but I've made them so much that I started experimenting with the recipe, sometimes on purpose and sometimes accidentally that they've really become my own now.  I have an aunt and uncle who always say that if you make at least three changes to a recipe you can call them Your Famous Waffles.  I'm not sure about that, but I'm going to share the recipe that we've settled on, although I will admit to an accidental recipe change even today.  This is a very forgiving recipe so don't be afraid to attempt some of your own changes.

On to the waffles!  

Cinnamon Oatmeal Waffles
3 c. flour
2 c. quick cooking oatmeal
2 Tbsp. baking powder
1 Tbsp. ground flax seed (Optional, but I love the texture it adds)
1 tsp. cinnamon
1/2 tsp. salt
4 eggs, beaten
3 c. milk (any kind)
4 Tbsps melted butter
2 Tbsp. vegetable oil
1 Tbsp. vanilla extract
4 Tbps. brown sugar

Kitchenaid Stand Mixer directions:  Add eggs, milk, butter, vegetable oil, vanilla extract and brown sugar to mixing bowl.  Mix on medium speed for about one minute until completely mixed and brown sugar is dissolved.  Add flour, oatmeal, baking powder, flax see, cinnamon and salt to liquid.  Mix for another minute at speed 2.  Scrape down the sides and mix for another 30 seconds.  Pour into a hot waffle iron; close lid quickly and open when done.  

Regular directions: In a large bowl mix together all of the dry ingredient but the brown sugar.  Set aside.  In another bowl mix eggs, milk, butter, vegetable oil, vanilla extract and brown sugar with a whisk.  Pour the liquid ingredients into the flour mixture.  Mix with a wooden spoon until blended.  Pour into a hot waffle iron; close lid quickly and open when done.  

Makes 8-10 six inch round waffles.

Most of the ingredients

A note on the waffle iron: you can use any type of waffle maker that you want.  I found this Belgian waffler at Kohls for $20 last fall after the one that my grandma gave me died.  This was their cheapest one, but it got the best reviews.  It works really well.  Our waffle maker has a light to indicate when the waffles are done, but the old one didn't.  I would just leave it for about 2 minutes and then gently lift the lid.  If it came up easily then it was done and ready to be removed with a fork.  If it didn't lift easily and the waffle started separating then it needed more time.  


Top with fruit and whip cream, eat them plain (Joe's favorite), add some syrup, really you can't go wrong.  And one final tip for you all, this is a large recipe. You can of course cut the recipe in half quite easily actually, or you can do what we do.  Joe will eat 2 and I'll eat one fresh, then we are usually left with 6 or 7.  We put these into a plastic storage bag and then freeze them.  Joe eats the rest of them all week for breakfast.  He takes one out and microwaves it for 20-30 seconds and then he toasts it to make it crispy and fresh tasting. 


Friday Night Pizza Party: Homemade Pepperoni Tomato, Shrimp Pesto and Hawaiian Pizza

My husband and I love to have people over for dinner.  Warning to you though if you ever come, we may put you to work when you arrive.  Think experiential dinner party!  Last night we decided to have a pizza party.  I put out some great toppings and then when our friends arrived, we got started topping the pizzas!  

Thanks for helping us make our pizzas last night friends!

I like to make pretty much everything from scratch, but you can always substitute any prepackaged ingredients that you would like.  If you don't feel brave enough to make your own dough for example, Trader Joe's makes a great refrigerated dough that I've used when I don't have the time for letting the dough rise.

Our table with the toppings ready for our guests

This takes some preparation on my part.  I mix up some of my Rustic french bread dough (tutorial on a previous post) which makes a delicious pizza dough.  I make up a full batch of the dough which will make 3 large pizzas.  If you don't need 3 pizzas, either halve the recipe, or mix it all up, use what you need and refrigerate the rest of the dough to make some French bread later.

Ingredients for the pizza sauce

We made two pizzas with tomato sauce and one with pesto.  For the tomato sauce, I just bought a can of tomato paste and mix in crushed garlic and some Italian herbs.  I'm very much an experimental cook, so I never measure this sort of thing, but I would suggest one large or two small garlic cloves (1 tsp) and then a 1/2 tsp of Italian herbs.  

Homemade Pesto 

I wish I could claim this delicious homemade pesto, but Joe makes the pesto in this house!  He does a fantastic job and likes making it.  I know that he uses pine nuts, olive oil, garlic, parmesan cheese and basil.  We get fresh basil plants from Trader Joe's for $3.29.  Love it.  No batch ever turns out exactly the same, but it's always delicious! Thanks Joe for the pesto.  Buy it from the store if you don't have a Joe in your house to make the pesto or if you don't want to tackle making your own pesto.


Preparing the baking stones and rolling out the dough.  

I put a light sprinkling of corn meal on a baking sheet.  I use both my baking stone and regular metal baking sheets.  They both work well, and they both get the corn meal.  I then roll the dough out on a floured counter with a rolling pin.  You can decide how thin you'd like to roll it, but I aim for about 1/4 inch.  That's what we've found as our preference.  If it gets much thicker it gets very bready (and we love bread).  And remember, it will also rise a little bit while you're baking it, so it'll end up being about 1/2 inch once the pizza comes out of the oven.  After I roll it out, I carefully transfer it to the baking tray before topping it.  

A rolling tip, if your dough is not easily rolling, let it sit for 20 seconds and try rolling it again perpendicular to your last rolling.  This allows the gluten to relax and be rolled again.  

Next up, the toppings!  Put a thin layer of tomato sauce on the dough.  I put about 1/2 of the paste on one pizza.  It doesn't look like it will be enough, but trust me, a little goes a long way and has a lot of flavor.  After the sauce, then top away how ever you'd like.  

We did three pizzas.  See them all below.  

Piazza number one: Pepperoni, Tomato and Basil

Toppings for one of the pizzas

We enjoy putting on tomato sauce, pepperoni or sausage, sliced tomatoes, mozzarella cheese and a sprinkling of fresh parmesan cheese on one of the pizzas.  The tomatoes caramelize so nicely in the oven and the parmesan cheese on the very top of the pizza is what gives it that lovely browned cheese topping.   We get our parmesan cheese at Kraemer from Watertown, WI.  They have very good cheese at reasonable prices.  They have flat rate shipping, so we put a large order in with a friend once or twice a year.  I didn't use freshly shredded parmesan before this, but it is really much more delicious.  

Bake at 425˚ for 20 to 25 minutes or until golden brown on top.


Doesn't it look lovely?  You'll only see the tomatoes at the very end of this one since that is how our guests wanted to have it!  That's the beauty of making it at home since it customizable.

Pizza number two: Shrimp Pesto (This is our favorite!)

We start with the layer of the pesto on the dough.  The we add shrimp, feta, mozzarella and parmesan cheeses.


Here you can see the pesto topped dough and in the background Joe is sautéing the shrimp.  We cut the shrimp into bite sized pieces.  Heat up a frying pan with some olive oil on medium heat.  Add 2 gloves of crushed garlic and heat for about 20 seconds before adding the shrimp.  Heat the shrimp for about one minute until it is mostly pink.  Add some more of that Italian seasoning to the shrimp while it is cooking.  It doesn't need to be cooked all of the way through because it will finish cooking while the pizza is in the oven.  


Bake at 425˚ for 20-25 minutes or until golden brown.

I'm so happy we have some of this one left over for dinner tonight too.  Yum, yum yum!!!


And finally our last pizza was a stuffed crust Hawaiian pizza.  The stuffed crust was one of those happy accidents during our last pizza night.  Our friend did a wonderful job shredding fresh parmesan for us, so we had a lot of it to use.  Also, we didn't quite have enough sauce since we were using up sauce from a pizza I had made a week earlier.  So we decided to try stuffing the extra cheese in the extra dough.  It was awesome!

To stuff the crust, spread the sauce on the dough in the middle and stay about 3 inches from the edge.  Put a line of cheese around the edge and then roll the excess dough up and around the cheese.

Joe stuffing the crust on our Hawaiian Pizza

Add Canadian bacon, pineapple and then mozzarella cheese.  Bake a 425˚ for 20 to 25 minutes.

The stuffed crust turned out to be delicious again

Throw your own pizza party soon and let me know how it went.  You can top it with anything you'd like.  You're really only limited by your creativity.  If you have some fantastic topping combo, let me know, and I'll have to try it next time.  These just happened to be the three that we enjoyed.  Serve with a salad and a glass of wine for an even better time.